It is inevitable for the woods in your house to have cracks, and these cracks could either be exterior or interior. This wooden furniture could either be outdoor railings, wooden tables, or tea tables, but wood will end up wearing out over time as a result of warping, aging, and moisture. You do not have to dispose wood because there is a crack on it, but you need to find out simple ways about how to stop a crack in wood from spreading.
If your purpose for reading this post is to find out easy steps on how to stop a crack in wood from spreading then today is your lucky day as that is what this post is here to show you today. You need to take all the necessary actions to make sure cracks do not keep spreading on wood, and the good aspect of these steps is you do not have to be a professional before you can carry out any of these steps. However, there are things to figure out before any step.
The first thing you must figure out before going ahead to implement any steps is to identify the crack on the wood which will help in knowing the suitable method that will prevent it from spreading. After identifying the crack and what method to use, all you have to do is follow all the outlined steps and you will have your wood in a brand new condition in no time. There are several methods that can be adopted when preventing a crack from spreading.
You do not have to start considering all the numerous methods you will find on the internet as we have narrowed it down to the best two methods for you. The reason why we picked these methods is simply because they are very effective and easy to implement. These two steps are listed below;
- Making use of wood epoxy or wood filler
- Making use of glue and sawdust
The interesting fact about these two methods is even though they both work effectively when dealing with cracks, there are specific situations where you can make use of them separately or individually. You can make use of the sawdust and glue method if the crack you are dealing with is very wide, while the wood epoxy or wood filler can be used when dealing with slim, elongated, and broad cracks.
Looking at both methods we have listed for you, you might be wondering which method to go for. The nature of the crack will decide what method to go for as you just cannot pick any method and use, but have it in mind that making use of epoxy is the best method if you are dealing with a crack that has gone round the wood. Epoxy will seep into relatively thin cracks, making it easy to bond with the wood.
Wood filler on the other hand is best used for medium sized cracks on wood, but you should stick to a wood filler if you intend painting, sanding, and staining wood as it has great bonding with wood. Compared to wood epoxy, wood fillers have a longer drying time, but if you are working on broad cracks and you want to reduce expenses, consider using the sawdust and glue method.
How To Stop A Crack In Wood From Spreading

Making Use Of Wood Filler Or Wood Epoxy
Making use of wood filler or wood epoxy remains one of the best options you can implement when dealing with cracks on wood, and cracks that have great depth should be handled using liquid wood fillers. This is because liquid wood filler posses the ability to seep into the wood with ease, and trust me when i tell you that wood fillers are very easy to use. Below are core steps you can follow when working with a wood filler in dealing with cracks.
Step One – Select A Wood Filler Or Epoxy
The fact about these two items is you cannot make use of them at the same time, so you are left with the option of picking one from both because they offer different end results. The first thing you have to do in order to pick between the two items is to figure out what their functions are and how they work specifically. Areas that are difficult to reach should be worked on using wood epoxy, and this is based on the fact that they have a high penetrable ability.
You can also use wood epoxy when dealing with a wide crack because of its ability to bond with wood, but you can opt for the wood filler when dealing with a surface crack. Wood fillers are not expensive, and the fact that they enable users to sand and paint places them at an advantage. Sanding and painting a wood you have worked on is very vital so the wood doesn’t have different colors or appearance.
The extent and nature of the crack will also help you select which item to settle for, but have it in mind that they are both effective when dealing with cracks on wood.
Step Two – Make Use Of Protective Gear
You put yourself in danger when you work with chemicals but do not provide yourself with any form of protection, and this is why it is very essential that you work with a respirator to protect the lungs from bad and harmful chemicals. This is very necessary if you are working indoors, while safety goggles is also important to protect the eyes from chemical. A long sleeve cloth is also vital in preventing sticky residue from your body.
Step Three – Cleaning And Preparation Of Wood
You need to prepare your wood before going on to apply wood filler or epoxy, and washing the wood with mild detergent and water is a good way of cleaning wood. The wood should be allowed to dry after washing, while debris or trash that is stuck in between cracks should be removed so they do not interfere with results. Cleaning up debris is crucial in knowing the extent of crack you are dealing with.
Step Four – Apply Filler Or Epoxy
Epoxy requires mixing as it comes in two forms which are the hardener and resin. Color should be added so the epoxy will rhyme with the color of the wood, and you should follow the manufacturer’s instructions when mixing the hardener and resin. Stir after mixing then apply onto the cracked areas on the wood.
Step Five – Drying Time
You should allow the surface you have worked on to dry for at least a day, and it is a known fact that epoxy has a faster drying time than wood filler. Permanent marker can be used in adding color to the wood so you can find it easy to sand and paint the wood.
Making Use Of Sawdust And Glue
This remains the most affordable and suitable method when dealing with cracks that are not so deep, and the following steps discussed below will guide you when working with sawdust and glue.
Step One – Prepare Sawdust And Wood Glue
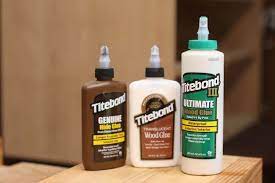
It is okay to get your sawdust from a scrap of wood or you buy a bag of sawdust, but ensure what you are working with has the same color as the wood you want to work with. It is important you get a standard wood glue as well.
Step Two – Apply Items
It is okay for you to fill up the crack halfway using glue then you add sawdust to fill it up completely, or you can decide to add sawdust halfway the crack first before finishing it up with glue. These are the two methods you can use when applying these two items, and both methods are very effective.
Step Three – Drying
You should allow the crack you have worked on to dry for at least a day, and you can sand the wood so it can be smooth when it eventually gets dried. After sanding, go on and stain the wood.
Judging from all the methods and steps we have discussed, you can see for yourself that these are thing you can do yourself without the help of a professional and expert. This is because these steps are very easy and do not require you to have a special ability or skill to get them done.
Wrapping It Up – How To Stop A Crack In Wood From Spreading
It is a natural thing for wood to get cracked, but getting rid of wood because there is a crack on it isn’t the right step to take. It doesn’t mean the wood is totally bad and damaged, but you can see from the steps we have outlined in this post that you can repair the wood and continue making use of it. It doesn’t matter if the crack is wide, long, broad, or slim, but what matters is identifying the crack so you can know what method to adopt in dealing with it.
The two methods we have discussed so far in this post have proved to be effective and easy to implement over the years, so there is a high level of assurance that you will be pleased with the results of any of these methods.